QuickHire User Guide
![]()
QuickHire is a desktop address book application designed for recruiters to manage and organise the details of their potential job candidates.
Quick start
Ensure you have Java
17or above installed in your Computer.
Mac users: Ensure you have the precise JDK version prescribed here.Download the latest
.jarfile from here.Copy the file to the folder you want to use as the home folder for your QuickHire application.
Open a command terminal,
cdinto the folder you put the jar file in, and use thejava -jar quickhire.jarcommand to run the application.
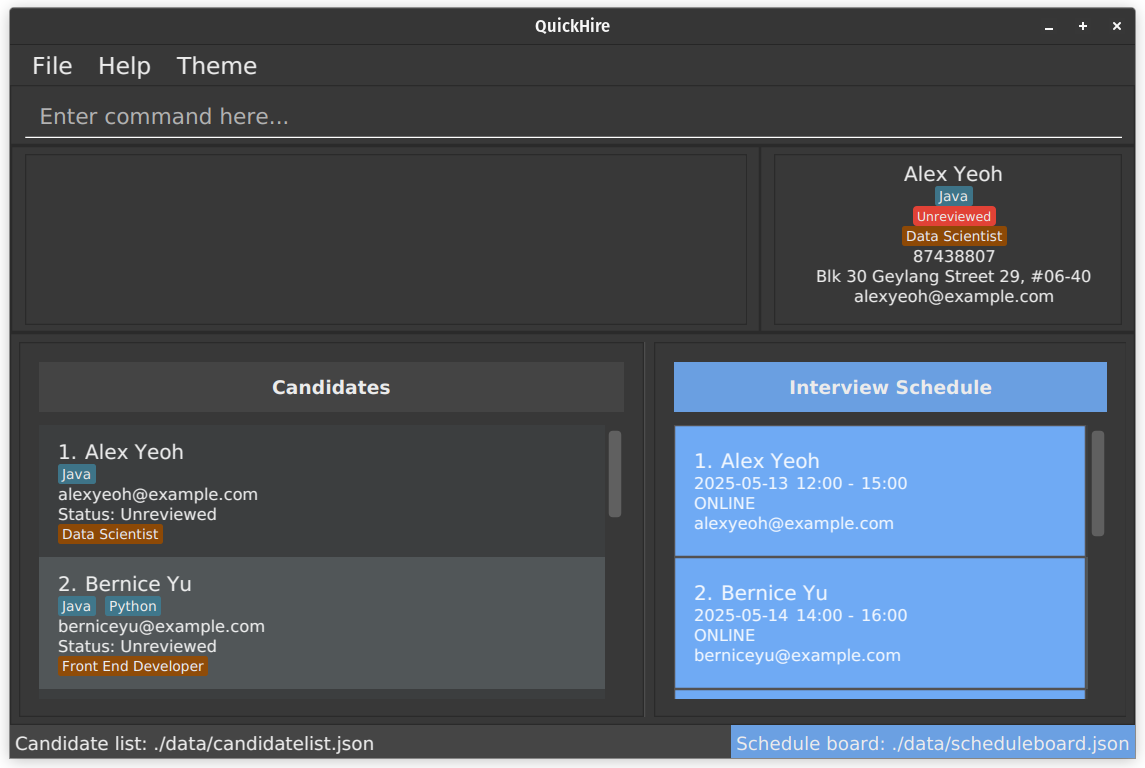
A GUI similar to the below should appear in a few seconds. Note how the app contains some sample data.
Type the command in the command box and press Enter to execute it. e.g. typing
helpand pressing Enter will open the help window.
Some example commands you can try:list: Lists all contacts.add n/John Doe p/98765432 e/johnd@example.com a/John street, block 123, #01-01 j/Software Engineer l/Unreviewed: Adds a contact namedJohn Doeto the Address Book.delete 3: Deletes the 3rd contact shown in the current list.clear: Deletes all contacts.exit: Exits the app.
Refer to the General command format below for details of each command.
General command format
Notes about the command format:
Words in
UPPER_CASEare the parameters to be supplied by the user.
e.g. inadd n/NAME,NAMEis a parameter which can be used asadd n/John Doe.Items in square brackets are optional.
e.gn/NAME [t/TAG]can be used asn/John Doe t/friendor asn/John Doe.Items with
… after them can be used multiple times including zero times.
e.g.[t/TAG]…can be used as(i.e. 0 times),t/friend,t/friend t/familyetc.Some commands have items starting with
/(e.g.,/a,/f, etc.). They are to be specified as they are without any parameters. e.g.save c/candidates.json /fParameters can be in any order.
e.g. if the command specifiesn/NAME p/PHONE_NUMBER,p/PHONE_NUMBER n/NAMEis also acceptable.Extraneous parameters for commands that do not take in parameters (such as
help,list,exitandclear) will be ignored.
e.g. if the command specifieshelp 123, it will be interpreted ashelp.If you are using a PDF version of this document, be careful when copying and pasting commands that span multiple lines as space characters surrounding line-breaks may be omitted when copied over to the application.
Viewing help : help
Shows a message explaining how to access the help page.

Format: help
Commands for candidate data
Adding a candidate: add
Adds a candidate to the address book.
Format: add n/NAME p/PHONE_NUMBER e/EMAIL a/ADDRESS j/JOB ROLE l/LABEL [r/REMARK] [t/TAG]…
Tip
A label can only be Unreviewed, Shortlisted, Rejected or Accepted.
A candidate can have any number of tags (including 0).
A remark can have up to a maximum of 150 characters.
A job role can have up to a maximum of 30 characters, including spaces.
For j/JOB ROLE field, the specified job role has be saved in the list of possible job roles.
To view all possible job roles, use listJ
Refer to this for more info.
Examples:
add n/John Doe p/98765432 e/johnd@example.com a/311, Clementi Ave 2, #02-25 j/Data Scientist l/Unreviewed r/Likes to code t/friends t/owesMoneyadd n/Vish p/1293123 e/sample@domain.com a/213123 street j/ProData guy l/Rejected
Listing all candidates : list
Shows a list of all candidates in the address book.
Tip
By default, only basic contact details are displayed.
To view full contact details of the candidate, use the view command.
Format: list
Editing a candidate : edit
Edits an existing candidate in the address book.
Tip
When you edit a candidate's name or email, their interview schedules will be updated automatically with the new information.
Format: edit INDEX [n/NAME] [p/PHONE] [e/EMAIL] [a/ADDRESS] [j/JOB ROLE] [l/LABEL] [r/REMARK] [t/TAG]…
- Edits the candidate at the specified
INDEX. The index refers to the index number shown in the displayed candidate list. The index must be a positive integer 1, 2, 3, … - At least one of the optional fields must be provided.
- Existing values will be updated to the input values.
- When editing tags, the existing tags of the candidate will be removed i.e., adding of tags is not cumulative.
- A remark can have up to a maximum of 150 characters.
- You can remove all the candidate's tags by typing
t/without specifying any tags after it. - You can remove a candidate's remarks by typing
r/without specifying any remarks after it.
Examples:
edit 1 p/91234567 e/johndoe@example.comEdits the phone number, and email address of the 1st candidate to be91234567, andjohndoe@example.comrespectively.edit 2 n/Betsy Crower t/Edits the name of the 2nd candidate to beBetsy Crowerand clears all existing tags.edit 1 r/Clears all remarks for the 1st candidate.edit 1 l/ShortlistedUpdates the label of the 1st candidate toShortlisted.
Viewing a candidate's full application details: view
Displays the full details of selected candidate.
Tip
The application will show the full details of the first candidate in the list on startup, if any.
Format: view INDEX
- Additional details about candidate shown include candidate contact number and address.
Example:
view 1Displays the full information of the first candidate in the side panel.
Locating candidates using keywords: find
Finds candidates whose details contain any of the given keywords.
Format: find KEYWORD [MORE_KEYWORDS]
The search is case-insensitive. e.g
hanswill matchHansThe order of the keywords does not matter. e.g.
Hans Bowill matchBo HansAll details of a candidate are searched.
Only full words will be matched. e.g.
Hanwill not matchHansCandidates whose details match at least one of the keyword(s) provided will be returned. The details of a candidate that will be searched for are as follows:
- Name
- Phone number
- Email address
- Address
- Job Roles applied for
- Label given to the candidate
- Remarks provided for the candidate
- Tags associated with the candidate
e.g.
Hans Bowill returnHans Gruber,Bo Yang
Examples:
find JohnReturnsjohnandJohn Doe.find alex davidReturnsAlex Yeoh,David Li.

Deleting a candidate : delete
Deletes the specified candidate from the candidate list.
Format: delete INDEX
- Deletes the candidate at the specified
INDEX. - The index refers to the index number shown in the displayed candidate list.
- The index must be a positive integer 1, 2, 3, …
- Note: Deleting a candidate won’t remove their interview schedules. We keep those schedules for record‑keeping so you can review past interviews.
- If you do need to delete them, use the sdelete command shown below. Examples:
listfollowed bydelete 2deletes the 2nd candidate in the address book.find Betsyfollowed bydelete 1deletes the 1st candidate in the results of thefindcommand.
Clearing all entries : clear
Clears all entries from the address book.
Format: clear
Adding remarks to a candidate : remark
Note: The functionalities of this command can be achieved via the r/REMARK flag in add and edit commands.
Format: remark INDEX [r/REMARK]
Tip
You can clear all remarks of a candidate at a specified INDEX by using the following command: remark INDEX
- Adds a remark to the candidate at the specified
INDEX. The index refers to the index number shown in the displayed candidate list. The index must be a positive integer 1, 2, 3, … - Existing values will be updated to the input values.
- You can remove a candidate's remarks either by typing
r/without specifying any remarks after it or by not specifying the parameter at all. - A remark can have up to a maximum of 150 characters.
Examples:
remark 1 r/Likes to codeAdds a remark (Likes to code) to the 1st candidateremark 1 r/Clears all remarks for the 1st candidateremark 1Clears all remarks for the 1st candidate
Commands for interview schedules
Tip
Commands used for managing interview schedules start with s.
Adding an interview schedule: sadd
Adds an interview schedule of a candidate to the interview schedule board.
Format: sadd c/INDEX s/INTERVIEW_DATE_AND_DURATION m/MODE
Tip
A mode can only be Online, or Offline.
Adds the interview schedule of candidate specified at the
INDEX. The index refers to the index number shown in the displayed candidate list. The index must be a positive integer 1, 2, 3, …INTERVIEW_DATE_AND_DURATION: Interview schedule for candidates- Format:
yyyy-MM-dd HH:mm HH:mmyyyy-MM-dd: date of the interview- First
HH:mm= start time - Second
HH:mm= end time
- Both start time and end time must fall on the same calendar day.
- Duration must be at least 15 minutes and no more than 4 hours.
- You may schedule interviews in the distant past or future—just as Google Calendar allows—to support record‑keeping and planning. The past schedules will be displayed in a lighter color in the schedule board.
- To schedule across midnight, split into two commands (one per day).
- Format:
MODE: Format of the interview- Either Online or Offline.
All fields must be provided.
Examples:
sadd c/2 s/2025-03-15 15:00 16:00 m/onlinesadd c/1 s/2025-05-05 9:00 10:00 m/offline
Listing all interview schedules : slist
Shows a list of all interview schedules in the interview schedule board.
Format: slist
Editing an interview schedule : sedit
Edits an existing interview schedule in the interview schedule board.
Format: sedit SCHEDULE_INDEX [s/INTERVIEW_DATE_AND_DURATION] [m/MODE]
- Edits the schedule at the specified
SCHEDULE_INDEX. The schedule index refers to the index number shown in the displayed schedule board. The schedule index must be a positive integer 1, 2, 3, … INTERVIEW_DATE_AND_DURATION: Interview schedule for candidates- Format:
yyyy-MM-dd HH:mm HH:mmyyyy-MM-dd: date of the interview- First
HH:mm= start time - Second
HH:mm= end time
- Both start time and end time must fall on the same calendar day.
- Duration must be at least 15 minutes and no more than 4 hours.
- You may schedule interviews in the distant past or future—just as Google Calendar allows—to support record‑keeping and planning. The past schedules will be displayed in a lighter color in the schedule board.
- To schedule across midnight, split into two commands (one per day).
- Format:
MODE: Format of the interview- Either Online or Offline.
- At least one of the optional fields must be provided.
- Existing values will be updated to the input values.
Examples:
sedit 1 s/2025-05-22 15:00 17:00 m/offlineEdits the date and duration, and interview mode of the 1st schedule to be2025-05-22 15:00 17:00,offlinerespectively.sedit 2 s/2025-05-25 14:00 15:00Edits the date and duration of the 2nd schedule to be2025-05-25 14:00 15:00.sedit 1 m/onlineEdits the mode of the 1st schedule to beonline.
Deleting an interview schedule: sdelete
Deletes the specified interview schedule from the interview schedule board.
Format: sdelete SCHEDULE_INDEX
- Deletes the interview schedule at the specified
SCHEDULE_INDEX. - The schedule index refers to the index number shown in the displayed schedule board.
- The schedule index must be a positive integer 1, 2, 3, …
Examples:
slistfollowed bysdelete 2deletes the 2nd schedule in the schedule board.
Clearing all interview schedules: sclear
Clears all interview schedules from the schedule board.
Format: sclear
Commands for managing saved list of job roles
The j/JOB ROLE can only take in certain job roles, which must match one of the job role in the saved list of job roles. This list is can be modified and is saved locally.
By default, when starting up the application for the first time, there are 9 job roles preloaded.
Back End Developer, Data Scientist, DevOps Engineer, Front End Developer, IT Administrator, Product Manager, QA Engineer, Software Engineer, UI Designer
These commands are to view and modify the saved list of job roles. Available actions include to add, delete and list all job roles.
Adding a job role : addJ
Adds a job role to the list of saved job roles.
Format: addJ JOB ROLE
Examples:
addJ Software Engineering InternaddJ Software Tester
Deleting a job role: deleteJ
Deletes a job role from the list of saved job roles.
Caution:
Deleting a job role does not modify any candidates job role. It is highly recommended to use find to look up the candidates
with the job role, and updating it before you exit the application.
Not updating the candidate' job roles before exiting the application will lead to job role displaying UNRECOGNISED
during the next start up of the application.
Format: deleteJ JOB ROLE
Examples:
deleteJ Software Engineering InterndeleteJ Software Tester
List all saved job role: listJ
List all saved job roles that can be added to any candidates
Format: listJ
Saving the data : save
Changes to data (pertaining to candidates and interview schedules) are automatically saved by QuickHire (see Editing the data file). However, users can choose to save this data to a separate file of their choice (i.e., by using this command).
Some common pointers missed by first-time users:
- At least one of
c/CANDIDATES_FILESors/SCHEDULES_FILEmust be specified. It is also okay to specify both. - The application needs to have sufficient permissions to write to the file(s) specified in order for the
savefeature to work.
Format:
save c/CANDIDATES_FILES [s/SCHEDULES_FILE] [/a] [/f]; OR
save s/SCHEDULES_FILE [c/CANDIDATES_FILES] [/a] [/f]
- At least one of
c/CANDIDATES_FILESors/SCHEDULES_FILEmust be specified. It is also okay to specify both. - Saves data pertaining to candidates into the file referred by
CANDIDATES_FILES - Saves data pertaining to interview schedules into the file referred by
SCHEDULES_FILE - By default, if a filename provided does not end with
.json, the application appends this automatically for the user.- E.g.,
save c/past_candidatesSaves the filtered data of candidates to[JAR file location]/past_candidates.json
- E.g.,
- By default, if a filter was applied to the data (e.g., using
find), then only the filtered data will be saved. - (Optional) Specify
/ato save all QuickHire data (instead of just the filtered ones). - By default, if the file(s) specified already exists, then no data will be overwritten to those file(s).
- (Optional) Specify
/fto overwrite the contents of the file specified - The application needs to have sufficient permissions to write to the file(s) specified in order for the
savefeature to work.
Examples:
save c/past_candidates.jsonSaves the filtered data of candidates to[JAR file location]/past_candidates.json(if it does not exist).save c/existing_file.json /a /fSaves the data of all candidates in the application to[JAR file location]/exiting_file.jsonand overwrites any existing data in the file.save s/interview_schedule.jsonSaves the (filtered) interview schedules to[JAR file location]/interview_schedule.json(if it does not exist).save c/candidates_details.json s/interview_details.jsonSaves the filtered data of candidates and (filtered) interview schedules to[JAR file location]/past_candidates.jsonand[JAR file location]/interview_schedule.jsonrespectively (if they do not exist).save c/past_candidatesSaves the filtered data of candidates to[JAR file location]/past_candidates.json(if it does not exist).
For advanced/tech-savvy users:
- You can choose to provide absolute file paths for file parameters if you wish to.
- Example (Linux):
save /a c//home/user/all_candidates.jsonSaves the data of all candidates in the application to/home/user/all_candidates.jsonif it does not exist (Note the additional/afterc/which indicates the beginning of an absolute path in Unix-like systems). - Example (Windows):
save c/C:\Users\User\potential_candidates.jsonSaves the filtered data of candidates in the application toC:\Users\User\potential_candidates.json(if it does not exist).
- Example (Linux):
Viewing job application statistics: viewstats
Displays the number of applications for each job role.
Format: viewstats
Changing the theme : theme
Changes the theme of the UI.
Format: theme dark/light
- You may change the theme using the above command or the GUI.
- Your theme will be saved the next time you re-open the application as well.
Exiting the program : exit
Exits the program.
Format: exit
Editing the data file
Data pertaining to candidates and interview schedules are saved automatically into two JSON files: [JAR file location]/data/candidates_list.json and [JAR file location]/data/scheduleboard.json respectively.
Advanced users are welcome to update these data directly by editing those data files.
Caution:
If your changes to the data files makes their format invalid (e.g. having duplicates or invalid data format), QuickHire will discard all data and start with empty data files at the next run. Hence, it is recommended to take a backup of the files before editing it.
This can be done by either copying the two files mentioned, or by using the save command (See Saving the data : save).
Furthermore, certain edits can cause QuickHire to behave in unexpected ways (e.g., if a value entered is outside the acceptable range). Therefore, edit the data files only if you are confident that you can update it correctly.
Archiving data files [coming in v2.0]
Allows for the automatic backup of data.
Details coming soon ...
Searching for interview schedule [coming in v2.0]
Provides a way to lookup interview schedules by date and/or time.
Details coming soon ...
Importing data files [coming in v2.0]
Allows for importing data files into the app.
Details coming soon ...
Sorting data displayed in the app [coming in v2.0]
Allows for the sorting of data that is displayed in the app.
Details coming soon ...
FAQ
Q: What if the same candidate applies to the same company a few months later?
A: There are 2 options:
- Edit the candidate's existing entry with the updated details; or
- Delete the old entry, and re-add the complete and updated details of the candidate (should there be any clashes in data)
Q: What if the candidate wants to apply for multiple roles within the same company?
A: Multiple job roles can be added using the edit command.
Q: I am trying to edit a candidate's information, but I received the error Job role not recognised!
A: Do check the valid list of job roles that you have saved using the listJ command. If any one of the job role of selected candidate has not been saved into the list of job roles, either
- Add the job role to the list of job roles using
addJ - Update the candidate's job role to a valid job role using the
editcommand
Q: I am unable to see the candidate the view command executes successfully.
A: If the candidate has a field that is very long, the box may run out of space. However, fret not, as adjusting the horizontal scroll bar to the center will show most of the details.
The view command is meant to be a workaround to view fields that are cut off in the candidates list.
Q: I have details of 37 candidates saved in the app. But when I run save, the file only has details of 2 candidates. Why is this so?
A: Probably the save command was executed without any optional flags. To be able to save all data, you have 2 options:
- (Easiest) Use the optional
/aflag ofsavecommand to save all candidates' information.
E.g.,save c/file_to_save.json /a - Run
listin the app to ensure the app no filtered is applied to the candidates' data. Then run thesavecommand as usual.
Q: I want to save the data of candidates and interview schedules. I want to overwrite any existing data I have of candidates, but I don't want to overwrite any existing data pertaining to interview schedules. What should I do?
A: Save both data separately using two commands (instead of one) like so:
- Save only the data of candidates first, specifying the
/fflag to overwrite any existing data.
E.g.,save c/candidates_as_of_24_July.json /f - Then, save the data on interview schedules separately, but without the
/fflag.
E.g.,save s/interview_schedules
Q: I have saved some data of potential candidates in a JSON file and I would like to import it into the application. What should I do?
A: As of v1.5.1, QuickHire doesn't support importing data files from within the application. However, there is a workaround. To import the data, perform the following steps:
- (Optional, but recommended) Make a copy of the data file you have (so that you have a backup copy in case the data gets corrupted).
- Close QuickHire.
- Rename the file you wish to import as either
[JAR file location]/data/candidates_list.jsonor[JAR file location]/data/scheduleboard.json.
In this case, you want to rename it as[JAR file location]/data/candidates_list.jsonsince you are importing data of potential candidates. - Launch QuickHire again. If everything went well, you should be able to view the data from the file you imported in the application.
Caution
Note that when you import data this way, you will only see the data from the newly imported file, and the data from the old file will be removed. If you wish to keep the old data file as well, create a separate backup of it (as mentioned under Editing the data file).
Q: The slist command seems not working?
A: In QuickHire v1.6, the slist command doesn’t affect the interview schedule display because search and sort features haven’t been implemented yet. Once those capabilities are added, you’ll see the schedule board updated.
For now, if you navigate back to the original, unfiltered schedule board—which shows every entry—you can run slist there. Although you won’t notice any change until the search/sort functions arrive, that’s where the command will take effect.
Q: I am able to save data to filename with emojis.
A: Some operating system allow users to have filenames with special symbols (not just limited to emojis).
Hence, QuickHire follows the behaviour of the operating system that it runs on when validating whether a filename is valid.
With that being said, it is probably a good idea to avoid the use of special characters like emojis in general in your filenames.
There is a great article from Michigan Tech University on Characters to Avoid in Filenames and Directories (link to external website).
Known issues
- When using multiple screens, if you move the application to a secondary screen, and later switch to using only the primary screen, the GUI will open off-screen. The remedy is to delete the
preferences.jsonfile created by the application before running the application again. - If you minimize the Help Window and then run the
helpcommand (or use theHelpmenu, or the keyboard shortcutF1) again, the original Help Window will remain minimized, and no new Help Window will appear. The remedy is to manually restore the minimized Help Window.
Flags summary
| Action | Description | Used in (command) | Example(s) | Mandatory? |
|---|---|---|---|---|
| n/ | NAME | add, edit | n/John | Yes |
| p/ | PHONE NUMBER | add, edit | p/91234567 | Yes |
| e/ | EMAIL | add, edit | e/john@example.com | Yes |
| a/ | ADDRESS | add, edit | a/21, Kent Street, 123123 | Yes |
| j/ | JOB ROLE | add, edit, addJ,deleteJ | j/Software Engineering Intern | Yes |
| l/ | LABEL | add, edit | l/Unreviewed | Yes |
| c/ | INDEX | sadd | c/2 | Yes |
| s/ | INTERVIEW_DATE_AND_DURATION | sadd, sedit | c/2025-05-20 13:00 14:00 | Yes |
| m/ | MODE | sadd, sedit | m/offline | Yes |
| c/ | CANDIDATES FILE | save | c/candidates.json | Yes (if SCHEDULES FILE is not specified) |
| s/ | SCHEDULES FILE | save | s/interview schedules.json | Yes (if CANDIDATES FILE is not specified) |
| r/ | REMARK | add, edit, remark | r/Amazing fit for company | No |
| t/ | TAGS | add, edit | t/Java | No |
| /a | Save all data | save | /a | No |
| /f | Overwrite existing file | save | /f | No |
Command summary
| Action | Format | Example(s) |
|---|---|---|
| Add | add n/NAME p/PHONE_NUMBER e/EMAIL a/ADDRESS j/JOB TITLE l/LABEL [s/INTERVIEW_SCHEDULE] [r/REMARK] [t/TAG]… | add n/John Doe p/98765432 e/johnd@example.com a/John street, block 123, #01-01 j/Software Engineer l/Unreviewed s/10-02-2025 10:00 r/Likes to code |
| Clear | clear | |
| Delete | delete INDEX | delete 3 |
| Edit | edit INDEX [n/NAME] [p/PHONE] [e/EMAIL] [a/ADDRESS] [j/JOB TITLE] [l/LABEL] [r/REMARK] [t/TAG]… | edit 2 n/James Lee e/jameslee@example.com |
| Find | find KEYWORD [MORE_KEYWORDS] | find James Jake |
| Remark | remark INDEX [r/REMARK] | remark 1 r/Has experience using JEE, remark 7 r/, remark 8 |
| Save (version 1) | save c/CANDIDATES_FILES [s/SCHEDULES_FILE] [/a] [/f] | save c/past_candidates.json, save c/candidates_details.json s/interview_details.json /a /f |
| Save (version 2) | save s/SCHEDULES_FILE [c/CANDIDATES_FILES] [/a] [/f] | save s/interview_schedule.json, save /a /f s/interview_schedule.json, save s/interview_details.json c/candidates_details.json /a /f |
| ViewStats | viewstats | |
| Add An Interview Schedule | sadd c/INDEX s/INTERVIEW_DATE_AND_DURATION m/MODE | sadd c/2 s/2025-03-15 15:00 16:00 m/online |
| Clear All Interview Schedules | sclear | |
| Delete An Interview Schedule | sdelete SCHEDULE_INDEX | sdelete 3 |
| Edit An Interview Schedule | sedit SCHEDULE_INDEX [s/INTERVIEW_DATE_AND_DURATION] [m/MODE] | sedit 1 s/2025-05-22 15:00 17:00 m/offline |
| Add A Job Role | addJ JOB ROLE | addJ Product Tester |
| Delete A Job Role | deleteJ JOB ROLE | deleteJ Front End Developer |
| List All Job Roles | listJ | |
| View | view INDEX | view 5 |
| List | list | |
| List All Interview Schedules | slist | |
| Help | help | |
| Theme | theme dark/light |